Choosing accessories for an off-grid inverter is not a minor shopping decision. It can affect safety, charging performance, battery life, and daily reliability. In real installations, a well-sized inverter may still underperform because its cables are too thin, its ventilation is restricted, or its protection devices are missing. A remote cabin, workshop, or emergency power system needs more than a box that converts electricity. It needs a carefully matched system.
What are the essential accessories for an off-grid inverter? The answer depends on the inverter type, battery chemistry, solar array, load demand, and installation environment. Common accessories include correctly rated battery cables, fuses or circuit breakers, disconnect switches, monitoring displays, temperature sensors, grounding equipment, and ventilation solutions. Some systems also require communication cables, transfer switches, or solar charge controllers. Details matter. A loose terminal can heat slowly behind a panel. A poorly placed temperature sensor can distort charging decisions. Small oversights become expensive lessons.
This guide presents seven practical tips for selecting compatible and dependable inverter accessories. It focuses on specifications, installation conditions, maintenance access, and long-term use. Manufacturer manuals and certified electrical professionals should guide final decisions, especially for permanent installations. No checklist is perfect. I have seen attractive accessories fail because compatibility was assumed instead of verified. The safest approach is careful comparison, realistic load planning, and honest attention to weak points before the system is energized.
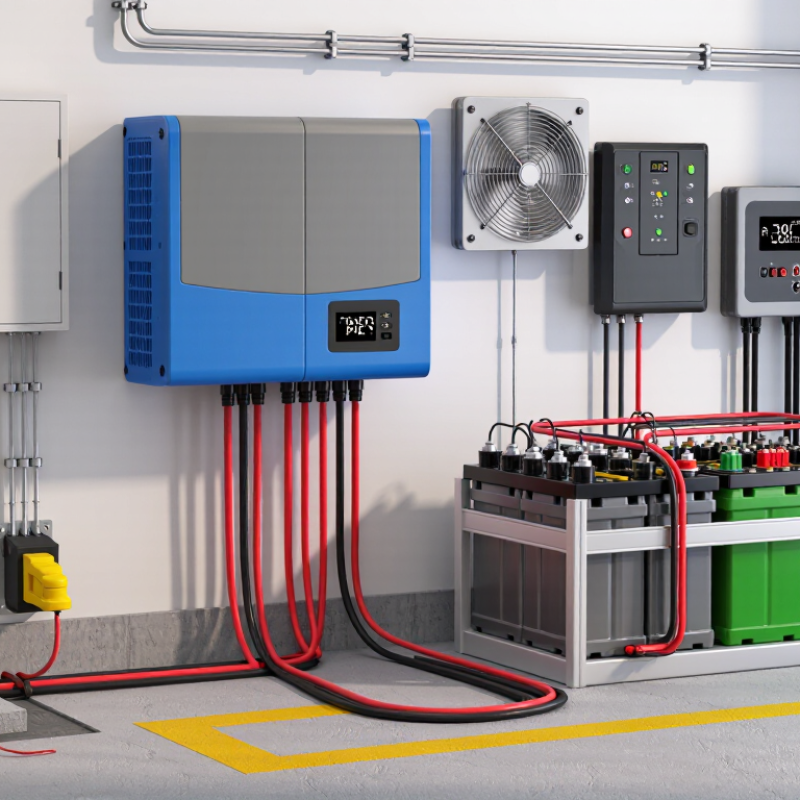
Understanding an off-grid inverter’s accessories prevents many installation problems. Battery cables carry high current, so choose the correct gauge, length, and terminal size.
A fuse or circuit breaker protects the cable during a short circuit. Install it close to the battery. A DC disconnect allows safer maintenance and quick isolation during faults.
These parts are not optional decorations.
A battery monitor measures voltage, current, and estimated charge levels. It helps reveal unusual consumption before the lights fail. A temperature sensor can adjust charging when batteries become cold or hot. This detail matters in garages, cabins, and outdoor enclosures.
Surge protection helps reduce damage from electrical spikes. I once underestimated cable heating during a small test system. The insulation stayed intact, but the terminals became warmer than expected. I should have checked connections sooner.
Choose a transfer switch only when the system requires another power source, such as a generator. It must prevent unsafe backfeeding and match the installation requirements.
Remote monitoring can display faults, battery status, and inverter output from a practical location.
Select waterproof connectors and enclosures for damp environments. Verify voltage, current, polarity, and temperature ratings before installation. Follow local electrical rules and use a qualified professional for unfamiliar work.
Specifications can look clear. Real conditions are less forgiving.
7 Tips for Choosing Off Grid Inverter Accessories?
Assessing System Voltage, Power, and Compatibility Requirements
Begin with the battery bank, not the accessory shelf. Confirm its nominal voltage, operating range, chemistry, and maximum charge current. A 24-volt inverter cannot safely share every 24-volt battery configuration. Measure actual voltage under load, because cable losses can create misleading readings. Short cables are not always better; correct conductor size matters more.
Match accessories to continuous and surge power. Pumps, refrigerators, and workshop tools may draw two to five times their running power during startup. The International Energy Agency reported global solar capacity passed 1.6 terawatts by the end of 2023. That scale does not make every off-grid component interchangeable. Select breakers, fuses, busbars, and disconnects for the system’s maximum current. Leave practical headroom. I have seen undersized terminals become hot after only a few hours.
Compatibility also includes communication and protection. Check connector polarity, charging protocols, grounding arrangements, enclosure ratings, and temperature limits. IEC 62109 addresses safety requirements for power converters used in photovoltaic systems, while IEC 62477-1 covers power electronic equipment safety. These standards guide selection, but they do not replace installation testing. Verify torque, insulation resistance, and voltage drop with suitable instruments. My early assumption was that matching voltage guaranteed compatibility. It did not. Installation conditions changed the result. Use manufacturer-neutral specifications, keep records, and recheck every connection after the first load cycle.
| No. | Selection Tip | Key Assessment | Example System Data | Accessory Requirement | Compatibility Check |
|---|---|---|---|---|---|
| 1 | Match the DC system voltage | Choose accessories that use the same nominal battery voltage as the inverter. | 12 V, 24 V, or 48 V battery bank; a 3,000 W load draws approximately 250 A at 12 V, 125 A at 24 V, or 62.5 A at 48 V before efficiency losses. | DC isolator, fuse, breaker, battery monitor, cables, and busbars rated for the selected voltage. | Verify the accessory's continuous DC voltage rating is at least the maximum battery charging voltage, not only the nominal voltage. |
| 2 | Size accessories for continuous and surge power | Account for running watts, motor-starting current, and inverter efficiency. | A refrigerator rated at 150 W may require 600–1,200 W during startup; a pump rated at 750 W may require roughly 1,500–2,250 W during startup. | Use a DC fuse, breaker, transfer switch, and wiring system that can handle the inverter's maximum continuous input current and short-duration surge. | Check both continuous and interrupting ratings. Do not size protection only from the average household load. |
| 3 | Select the correct DC cable and protection | Limit voltage drop and protect conductors from short-circuit current. | For a 48 V, 3,000 W inverter drawing about 70 A, a short cable run may use approximately 25 mm² copper cable, subject to local code and installation method. | A DC-rated fuse or circuit breaker installed close to the battery; cable lugs, busbars, and insulated covers matched to the conductor size. | Check one-way length, total circuit length, allowable voltage drop, ambient temperature, bundling, and the cable manufacturer's ampacity table. |
| 4 | Verify battery chemistry and charging limits | The battery type determines charging voltage, current limits, and control requirements. | A 48 V lithium battery may require a charge voltage around 56–58 V, while a 48 V lead-acid bank may use a different absorption and float profile. | Temperature sensor, battery monitor, shunt, communication cable, and a charger or inverter-charger with adjustable battery settings. | Confirm charging voltage, maximum charge current, low-voltage cutoff, temperature compensation, and battery-management-system communication requirements. |
| 5 | Check solar-controller voltage and current limits | The solar array's open-circuit voltage and short-circuit current must stay within controller limits. | For a controller with a 150 V maximum PV input, a cold-weather string voltage of 120 V may be acceptable, while a calculated 165 V string would be unsafe. | PV isolator, string fuses where required, surge protective device, PV cable, MC4-compatible connectors, and grounding accessories. | Use the panel's temperature-corrected open-circuit voltage and maximum current, including permitted array over-sizing rules. |
| 6 | Match AC switching and distribution equipment | AC accessories must match output voltage, frequency, phase, and maximum current. | A 120 V, 2,000 W load draws about 16.7 A; a 230 V, 3,000 W load draws about 13.0 A, excluding power-factor effects. | AC distribution board, residual-current protection where required, circuit breakers, transfer switch, conduit, and appropriately rated outlets. | Confirm the switch is suitable for the AC voltage, poles, frequency, neutral arrangement, and inverter's maximum output current. |
| 7 | Plan monitoring, ventilation, and environmental protection | Protect equipment from heat, moisture, dust, and inaccurate battery-state readings. | A battery monitor commonly uses a 50 mV or shunt matched to the maximum expected current; equipment operating above 40°C generally requires derating or improved ventilation. | Remote display, shunt, temperature sensor, ventilation fans, cable glands, corrosion-resistant enclosure, and labels. | Check enclosure IP rating, operating-temperature range, sensor cable length, communications protocol, clearances, and manufacturer derating instructions. |
Note: Example values are for preliminary selection only. Final cable sizes, protective-device ratings, grounding, and installation methods should comply with the applicable electrical code and the equipment manufacturer's instructions.
Tip 1: Match the battery to the inverter’s voltage and surge requirements.
Lithium iron phosphate batteries often deliver stable output, but their protection system must communicate correctly. The IEA’s Batteries and Secure Energy Transitions report states that global battery demand reached about 750 GWh in 2023. That growth improves choice, but specifications still vary widely. Check continuous current, peak current, usable capacity, and low-temperature limits. Do not size only by amp-hours.
Tip 2: Choose cables by current, distance, insulation rating, and installation temperature.
Short, thick copper cables reduce voltage loss and heat. A practical target is often below 2% loss on critical DC circuits. However, this is not universal. My early installations sometimes used acceptable cable sizes with poor terminal torque. Heat appeared at the connection, not the cable. Use correctly crimped lugs, strain relief, and protected cable routes.
Tip 3: Install fuses and disconnects near the battery.
Select DC-rated devices that can interrupt the battery’s prospective fault current. The National Renewable Energy Laboratory’s 2024 Annual Technology Baseline commonly models lithium-ion storage round-trip efficiency near 85–90%. Every fuse, connector, and switch reduces efficiency slightly. Protection also needs coordination, so a smaller branch fuse should clear before the main fuse.
Tip 4: Add surge protection, grounding, and battery monitoring where conditions justify them.
Outdoor arrays face lightning and switching surges. Follow local electrical codes and the inverter manual. I would not rely on one protective device alone. A missed ground path can undermine an otherwise careful design. Record cable lengths, fuse ratings, torque values, and commissioning measurements for later inspection.
Choosing Off Grid Inverter Accessories: Monitoring Tools, Transfer Switches, and Installation Hardware
A useful monitoring tool should show battery voltage, load demand, charging current, and inverter temperature. Live data helps identify problems before lights flicker or batteries discharge too deeply. Choose equipment with clear alerts, readable displays, and records you can review later. Wireless monitoring is convenient, but a local display remains valuable when the network fails. I have found that simple readings are often more useful than crowded dashboards.
Transfer switches require careful attention. Select a switch rated for the system’s voltage, current, and switching arrangement. It should prevent unwanted connections between power sources. Never judge suitability by appearance alone. An electrician or qualified installer should verify wiring, grounding, and isolation procedures. A small labeling mistake can create serious confusion during maintenance. Test the switch under controlled conditions, not only when an outage occurs.
Installation hardware deserves equal care. Use properly sized cables, secure terminals, weather-resistant enclosures, and strain reliefs near heavy conductors. Keep ventilation openings clear, especially in dusty utility rooms. Mounting hardware must support vibration and the inverter’s full weight. I once underestimated cable movement near a terminal; the connection needed retightening sooner than expected. That experience changed my checklist. Even reliable components can perform poorly when installation details are rushed.
This chart presents a practical evaluation weighting for off-grid inverter accessories. Compatibility and electrical safety receive the highest priority, followed by monitoring capability, transfer-switch performance, environmental protection, and installation convenience. Use these percentages as a planning framework and verify the final specifications against the inverter manual, local electrical codes, and site conditions.
Tip 1: Check safety standards before comparing prices. Choose cables, fuses, breakers, and connectors rated for your inverter’s voltage and current. Look for recognized electrical testing marks and clear installation instructions. In field inspections, undersized cables often cause heat buildup near terminals. That warning deserves attention. I once found a loose crimp hidden behind a battery cabinet. The system still worked, but the connection was unsafe. A qualified electrician should verify grounding, overcurrent protection, and enclosure ratings for the local environment.
Tip 2: Treat durability as a daily requirement, not a sales promise. Outdoor accessories face dust, moisture, ultraviolet light, vibration, and temperature changes. Select sealed connectors and corrosion-resistant hardware where conditions demand them. Check whether cable insulation remains flexible in cold weather. Cheap plastic can become brittle faster than expected. Still, no accessory is completely maintenance-free. Inspect torque, discoloration, damaged insulation, and unusual odors every few months. Keep simple records, including inspection dates and replaced parts.
Tip 3: Plan for maintenance and future expansion while installing the first system. Leave practical space around the inverter, disconnects, and ventilation openings. Use labeled cables and accessible service points. If additional batteries or solar input may be added later, confirm compatible voltage ranges and protection requirements now. Extra capacity can prevent expensive rewiring, but oversized accessories can also waste money. Local electrical rules may change, so review current requirements before expanding. My own planning has sometimes been too optimistic; actual loads should guide every upgrade.
Check voltage, continuous current, peak current, usable capacity, and low-temperature limits. Do not size it by amp-hours alone. The battery’s protection system must communicate correctly with the inverter. Compatibility matters.
Choose cables by current, distance, insulation rating, and installation temperature. Short, thick copper cables usually reduce heat and voltage loss. Keep critical DC voltage loss near 2% when practical. This target is not universal.
Poor terminal torque or a weak crimp can create resistance. Heat may appear at the connection, not along the cable. Use correctly crimped lugs, strain relief, and protected cable routes. Check hidden connections.
Place them close to the battery. Use DC-rated devices that can interrupt the available fault current. A smaller branch fuse should normally clear before the main fuse. Protection coordination is easy to overlook.
Consider them for outdoor arrays, lightning-prone areas, and systems exposed to switching surges. Follow local electrical rules and the inverter manual. One device is not enough. A missing ground path can weaken the design.
Inspect torque, discoloration, damaged insulation, corrosion, unusual odors, and brittle connectors every few months. Check sealed connectors after wet or dusty seasons. Keep inspection dates and replaced parts. Simple records help.
Look for resistance to moisture, dust, ultraviolet light, vibration, and temperature changes. Confirm that insulation stays flexible in cold weather. Cheap plastic may become brittle sooner. No accessory is maintenance-free.
Leave space around the inverter, disconnects, and ventilation openings. Label cables and keep service points accessible. Confirm future battery and solar voltage ranges now. Extra capacity may reduce rewiring, but oversized parts waste money.
Record cable lengths, fuse ratings, torque values, grounding details, and commissioning measurements. These details support later inspection. Memory is unreliable. Actual loads should guide future changes.
Choosing the right off-grid inverter accessories is essential for building a reliable, safe, and efficient independent power system. What are the essential accessories for an off-grid inverter? The main components typically include compatible batteries, properly sized cables, fuses, disconnects, grounding equipment, and protection devices. Before purchasing, assess the system’s voltage, expected power demand, surge requirements, and compatibility between the inverter, battery bank, and connected loads. Correct sizing helps reduce energy losses, overheating, and premature equipment failure.
Additional accessories can improve convenience and long-term performance. Monitoring tools help track voltage, battery status, energy consumption, and system faults, while transfer switches support safe transitions between power sources when appropriate. Durable mounting hardware and weather-resistant enclosures can simplify installation and protect equipment. It is also important to review safety standards, maintenance needs, ventilation requirements, and future expansion plans. Selecting dependable components with suitable ratings and clear documentation ensures the system remains manageable, adaptable, and secure throughout its service life.

NovaVolt Service